
Missing files | File Management | Work in a team
File Missing
The first time you'll see this message you might get a bit frustrated.

This blogpost will explain to you all you need to know to avoid this from happening, how 3DVista handles your files and how to work efficiently as a team on a 3DVista project.
What causes a missing file in 3DVista
Everything you import into 3DVista has a filepath.
For example importing image.jpg the filepath might be:
C:\Projects\Client\Photos\image.jpg

*File paths on mac don't start with C:\, but usually with something like Volumes/ or Documents/ or Applications/
If you change either the location of the saved vtp file or anything in the filepath (such as foldernames or filenames), then this results in a missing file.
You need to find it back and replace it.
There's no way to ignore this message, as that will result into not being able to open the project at all.
If you can't find the file anymore
If you are unable to find the file at all, then you need to create a placeholder file yourself and name it to the missing file to replace it, so you can still open the project in 3DVista.
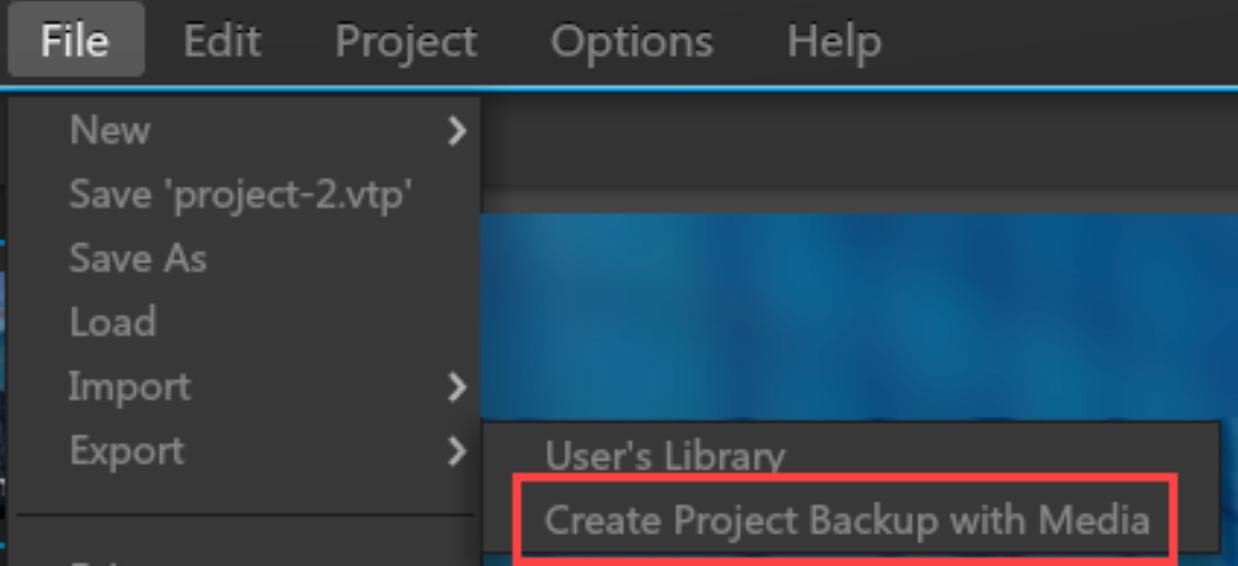
How to prevent this from happening
File > Export > Create project backup with media.

How project backup with media works in 3DVista
This will gather all the imported files that are needed for the 3DVista project and place them inside one folder. The imported files are now duplicated into that new folder.
The new folder generates a folder structure such as this one:

The filepaths are now transformed relatively to the folder. So C:\Projects\Client\Photos\image.jpg turned into \media\panoramas\image.jpg
That means you can move around that folder to any other location on your machine or any other machine.
You can change folder names and filenames that you previously imported, as they are not being used inside the backup project of 3DVista anymore. Only if you open the project.vtp that is created in the backup folder.
Check in which vtp file you are currently working in
When opening 3DVista and selecting your project, you might be confused in which .vtp file you are working. To check this, you can go to File and see after "Save" which .vtp filename is showing up. That is the .vtp file you are working in. If it's empty, you are working inside an internal .vtp file that is automatically created. Then you can hit Save As, create your own .vtp file and open it. It will now show up your own .vtp file in File menu.

Missing files even when saved as project backup with media
When zipping a project file on a Mac in which some filenames/folders contain special characters such as è or german ß, then Windows unzips the folder with incorrect characters and 3DVista tells you there are still missing files. What you need to do is to go to the filenames, and correct them again with è or ß. Then open the project.vtp again. Or just avoid using these special characters at all.

In this example you're looking at an unzipped 3DVista backup with media folder. Zipped in Mac, Unzipped in Windows.
Original filenames: bèta.jpg | nospecialcharacters.jpg | straße.jpg
How to share a project with your colleague
Alternatively you can share this folder with your colleague to open the 3DVista project on your colleagues machine.
Your colleague will need to open the project.vtp file that is generated. It can be saved as a new vtp file again, as long as that new saved vtp file stays in the same folder due to relative file paths.
This folder you can place in a dropbox/googlecloud/anyothercloud folder that is synced in your File Explorer (windows) or Finder (mac).
As soon as the folder synced all the files, your colleague can open the 3DVista project with the new changes made. Then your colleague makes changes, hit save, wait for the cloud to sync the file(s), and someone else can work on the project again.

Google drive: sync the folder in which you sync the project backup with media. Or one folder in which you keep all the 3DVista files.
Can you work simultaneously on the same 3DVista project?
No, but yes.
Let me explain. Working simultaneously on a 3DVista project has an expectation such as Google Docs were you can see multiple cursors making changes in the document. That is something which is not possible.

It is possible that one colleague creates a skin container or multiple skin containers, and that the other colleague is importing all the panoramas, connecting the panoramas with navigation hotspots and adds the hotspot images/videos/polygons to the panoramas.
Only one person can work on the imported media (videos, photo albums, panoramas, 360Videos).
Multiple people can work on different skin elements as long as each person is working in one main container (which might have multiple sub containers). Because a container can be exported and imported as a vtl file (tutorial).
So as for example three colleagues are working on the skin, one is working on the media.
After the skin elements are ready, they can be exported as .vtl files. And then imported into the main project of the colleague which is working on the imported media project. Then from that moment, only one person can work simultaneously on the project.
If you take this to the most efficient level, you make sure that after this stage, you have someone available in another timezone to continue working 24/7 on the 3DVista project in which the 3DVista files are continuously synced to the cloud after an 8h shift is done, the other colleague picks it up. If you're looking for 3DVista experts in different timezones, feel free to contact me.
Project ID & cache files
When starting a project in 3DVista, the project automatically creates a project ID in a format such as: XXXXXXXX-XXXX-XXXX-XXXX-XXXXXXXXXXXX.
Each vtp file is attached to such a project ID. When you’re duplicating a project, it duplicates everything in that current project into a new project ID.

And this new project ID shows up in the My Tours section in 3DVista.

You can find your project ID in the folder (windows):
C:\Users\[USER]\AppData\Roaming\tdv.show\Local Store.
Attention! Don’t change anything here especially if you’re not knowing what’s happening here. It’s at your own risk. But you can take a look to understand what’s going on.

Try creating a new project in 3DVista, and see how a new folder gets generated in here. Then import a panorama. As soon as you click on the very first preview, it creates the multiresolution panorama and you can see that these files are saved inside this project ID folder.
As soon as you clear cache, you can see that it basically deletes the files inside the project ID. And then everything gets regenerated as soon as you hit the preview button again.
That’s also why Publish happens quite fast, it’s because most of the files are already created in this cache.
So sometimes (especially when working in the skin), a change made such as replacing an image doesn’t take effect. It’s because for some reason the file doesn’t get recognized. And clearing cache and creating the cache again, it can solve the problem.
Pro tip: if you have a project with a huge amount of imported media and you want to create a new skin, then do this in a new empty project in which you can clear cache fast. Once skin is finished, then export the skin from the new project into the main project.
Hope it helped you guys, have an awesome day! 😎

Learn from our Tutorials
1000's of hours already watched by our community the last year